Talking heads, not the music group, seem to always go with videos about historical figures. And while I admire how Ken Burns became the legend using historians to tell the stories, giving authority and weight to facts and ideas, making pictures of the people talk can be so much more fun.
Activity Goal:
Create a talking head (picture) from an online image using Adobe After Effects. In this case, I want Thomas Jefferson to sing a little Edwin Starr. The challenge will be to separate out the vocals so Thomas' lips are matching the lyrics. Could I have used a tool like
Babberize? Sure, but what's the fun in that?
Final Product:
Below is the final product:
If you're wondering why I selected, "War," it's because I thought it would be cool. TJ wanted a smaller Navy, didn't believe in having a lot of soldiers, and really wanted to make the government small...like, tiny small. What he found instead was, a small Navy could not protect American ships or its citizens from impressment. After decommissioning most of the Navy ships, he would wage war against the Barbary States after their acts of piracy, kidnapping, and ransom challenged the US. Naturally, he'd now need a larger Navy. After all, this is a nation built off of trade and trade must be protected against pirates! We also had growing tensions with the British who openly challenged US sovereignty through impressment. Enough of the history lesson, let's make a video that reflects his ideal in not getting involved in war.
Steps:
Plan out who you want to display and the audio prior to creation.
Locate your image and remove the back drop. If you use Photoshop, because you want to learn photoshop and you already pay for Adobe Creative Cloud, get a high resolution image, copy it to your clipboard and open up the file. If you download the file in Chrome, the download will appear at the bottom of Chrome. Drag and drop that file into Photoshop. The file opens.
To remove the background in Photoshop, follow theses steps.
- In the Layer's Pane, duplicate the "background" image and then delete the background layer.
- Under the Properties Pane, scroll down to "Quick Actions." Click, "Remove Background."
- File > Export > Quick Export as PNG
Open After Effects.
Import your PNG file. This will place it in your project files. Now, click the image and drag it into the composition panel. You now a layer. You will duplicate the composition (Ctrl+D). Let's rename the new composition as "Mouth."
Now, we want to create the mouth. Go to the Pen Tool. Now, click around the lower mouth. Once finished, you with see just the lower mouth. We now need to make a mask on the original image.
Go to the TJ layer and paste in the mask. Then drill down to mask and invert it. TJ will now have a black hole for his lower jaw.
Careful, we don't want the mouth composition to moveout of position. So, let's link the mouth to the parent image of Thomas. In the composition panel, go to the "mouth" composition and look for the "Parent & Link" column. Click the dropdown and select the composition image of TJ. Now, when you move TJ, the mouth will follow.
Now we need the music. Find your music file. Drop it into the composition panel. The music file will be added. This is great, but we still don't have movement. And, if we did have movement, TJ's lower lip would be twitching like a nervous teenage boy on his first date. So, we need to give TJ some confidence. To do that, we're going to add another audio clip that isolates the vocals.
To isolate the vocals, we are going to use an AI called Vocal Remover (https://vocalremover.org/). While the program is free, it's always classy to give a donation here and there. Upload your file, give the system a minute, and then play the file to test it. Click "Save" in the lower right corner, and select "Vocal." Your download will appear.
Grab the downloaded file and pull it into the composition panel. Rename it to something like, "vocals." Now for the magic. Make sure your "vocals" composition is selected, right click, then select Keyframe Assistant > Covert Audio to Keyframes. A new keyframe will appear in the composition panel. It should read something like, "[Audio Amplitude]." Rename to something like, "lips."
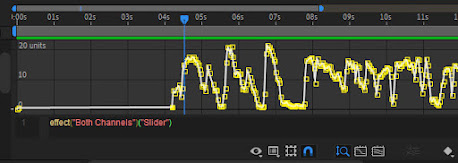
The "lips" breaks down the right and left channels. To get to the channels, expand the layer, then expand the Effects. We only need "Both," so you can delete the Left and Right channels. Click "Both Channels" and open it up to see the "Slider." With the slider selected, click on the "Graph Editor" option.
Now, we can connect the "mouth" transform layer's position to that of the slider. To do that, right click on the position, select Separate Dimensions. The X and Y positions appear. We only need to fiddle with the Y Position. Grab the whip next to the Y Position and link it to the Slider under the lips layer. Finally, a coded expression area appears, add "+Value" to the end. Click off the area and the mouth will realign. The mouth is now connected the amplitude of the lips layer.
We're almost there! If you want to preview, go to the panels on the right. The third option down should read, "Preview." Go to the main composition and then click play in the preview. The lips should be moving to the music. But, he might be a little tight lipped, so let's widen out that mouth and have him belt out the lyrics.
Go to the Lips and then the slider. Make sure you are still in the graph editor view. Click on "Slider" until the graph highlights yellow. Now, every single point is selected. You will notice white squares and the corners and center lines. Grab the top-center white square and pull it up to about 32 units. This amplifies the jaw drop.
For my music, there is a drum roll that makes TJ's lower lip tremble. He should be far more confident, so let's fix that. I click and dragged, creating a box that selected the portions that I wanted to edit. Then, I pressed delete. That's right, I deleted those positions. Then, I grabbed the next position and lowered it to the baseline. The end effect is a tight lipped TJ for the opening.
Now for the publishing. Go to File > Export > Add to Adobe Media Encoder. I have my presets for TV Broadcast H.264 High Quality 1080p HD. Press the play arrow and it will save the file. I figure, uploading to YouTube at some point to show off to my students will be cool.
Here is the final video...a little different from the original above. I didn't transpose TJ in photoshop for this video.
More Practice:
This is the first After Effects video I have created. I followed a tutorial from Boone Loves Video (YouTube:
https://www.youtube.com/@BooneLovesVideo). Watching a few videos from Johnny Harris and Boone, I got inspired to try something new. Hopefully, you get inspired too.
--A. Silvey


Comments
Post a Comment