Rubric Hero
About - Process
About:
Rubric Hero is a Google App Script designed to allow the user to build analytical rubrics with weighted categories. There are three components to the service: 1) App Script to run the Web App, 2) Rubric Hero Grade Book - A Google Spreadsheet that houses the lesson data and scores, 3) Rubric Hero - Templates - A Google Sheet that stores the physical rubrics. Rubric Hero allows the user to do the following:
- Create weighted rubrics
- Post Assignments to Classroom (required to use rubric feature)
- Sidebar scoring
- Post scores to Classroom (assignment must be posted using program for this feature)
- Publish individualized rubrics and returned to student via Classroom
- Download of CSV for upload to ASPEN or spreadsheet for further analytics.
Process:
Step 1: Download and Create Rubric
Download the Google Sheets. Open the Rubrics - Rubric Hero - Templates spreadsheet first. Click on "Rubric Hero🦸♀️" in the menu bar; select New Rubric. Accept the permissions. Create a rubric. You can always delete it later. If your total percentage weights exceeds or falls below 100%, the column will be become highlighted. Adjust the weight to total 100%. You can adjust the cells as you see fit in the event you wish to print the rubric. If you delete the rubric, make sure you delete the row from the TOC page. Keep the spreadsheet open. You'll need the ID and URL very soon.
Step 2: Download Grade Book
If you haven't already, download the Google Sheet "Rubric Hero - GB". Keep the spreadsheet open.
Step 3: Create a Copy of Rubric Hero.gs
Open the Rubric Hero.gs file in a Chrome Browser. Then do the follow:
1. Create a Copy ---- File > Make A Copy
2. Update Project Properties
File > Project properties
Click Script properties tab
Add Property:
wsID --- paste the Rubric Hero - GB id found in the URL of your file
ex:

id: 1dL3BIWtf3Sq7SItRFJuzbGXuFLwHlJVtiN-kOOzcQHU
rsID --- paste the Rubrics - Rubric Hero - Templates id found in the URL
urlRubric -- paste the Rubrics - Rubric Hero - Templates URL
3. Save --- File > Save All
 |
| Publish as Webapp |
4. Publish > Deploy as web App
Give a version number, click save
Accept Permissions
Copy the URL that ends in exec
Bookmark the URL
Step 4: Connect Courses
You can now close both spreadsheets and use the webapp.
Click on the "Courses" Tab. The courses will populate. Select and save the courses you want to add. Clicking the Refresh Button updates the topics held on Google Classroom.
Step 4: Adding Rubrics
If you want to add additional rubrics, click on the "Rubrics" tab and press the button. You should have at least one rubric created prior to creating an assignment.
Step 5: Add Assignment
If you want to add additional rubrics, click on the "Rubrics" tab and press the button. You should have at least one rubric created prior to creating an assignment. If not, the program may freeze or produce an error.
When adding the assignment, you must add a due date. You have the option of posting immediately or scheduling the post. If the current day is past 12PM (noon) local time, you will need to set the due date for the following day. You may edit due dates and times in Classroom without affecting the program.
To attach a Google Doc as a copy for each student, paste the URL for the Google Doc in the bottom input group. If sharing a Google Doc, make sure the document is shareable and add the link to the top form filed. Pressing the "+" adds an input, "-" deletes the input, clearing the contents. If distributing copies of Google Docs to students, you must schedule the post. Keeping the date option blank creates a draft that will post after 5 minutes.
Step 6: Grading
Clicking on the Grading button allows you to select assignments. Before you can grade, you need to download the submissions. Click "Update". Then, find the drop down, "Get Work | Create Rubric", select "Get Submissions". The assignment needs to be posted (live) on Classroom to get submissions.
Clicking Grade will open the selected student's attachment (if existent) and populate the rubric in the sidebar.
Step 7: Create Rubrics & Post Grades
Click on the Grading button and go to the desired assignment by clicking "Update". Then, find the drop down, "Get Work | Create Rubric", select "Create Student Rubrics". The rubrics will be created, shared, and individually posted to the Classroom assignment. When you return the work by clicking "Post Grades > Post - Return", the student will be made owner of the rubric. Once ownership is given to the student, you cannot reclaim it or remove it as a student attachment.
Step 8: Uploading Grades to Aspen
In the download button, click on CSV - Aspen Format. This creates a downloadable CSV file that may be uploaded to Aspen. You need to ensure the assignment is already created in Aspen, the point values are the same, and the due date is the same. Make any needed edits prior to uploading.
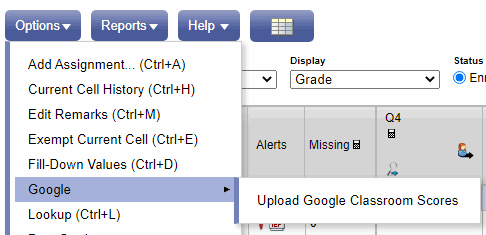
In your Aspen Gradebook, go to "Options > Google > Upload Google Classroom Scores" and upload your CSV file and press the preset you desire. I've noticed occasional errors where some student scores will not update due to the email formatting within Aspen. Aspen is looking for exact matches between emails.
Step 9: Update the Status
When finished with assignment, update the status so that you may quickly find open assignments that need grading.


Comments
Post a Comment